Sunday, April 5, 2009

It's a Boy!!!

Before you get the wrong idea...NO I'm not pregnant!!! My friend on the other hand is and she is having a BOY!!! This will make 4 boys for her...brave woman! We are throwing her a baby shower at my house and I wanted to do something special for her. So I decided to go with a car theme for my baby gift. I found a cute little pj set with the exact same little car that matched my stamp...how lucky can a girl get!! So I made her a few note cards, decorated a little cotton ball & q'tip set, made her bag all cute-sfied and then filled it with all the baby necessities! Here are a few pictures of her gift. I really hope she likes it. I have all girls so it's not very often that I get to make something boyish.


I made a set of 5 of these.


Monday, March 30, 2009

Cocktails Anyone?

This is my entry for the MFTIJ03...

The theme was Girls Night Out! The only catch was you had to use one of the MFT's Who's That Girl sets. Well I used my Hanging With My Peeps set. Originally she is holding a little bird, but I thought since it's GNO, why not hold some purses. Someone always has to stay behind and hold the purses while your dancing right?
So for my card, I paper pieced her outfit, using decorative paper from Luxe's Cocktail Dress series...Amaretto Sour & Martini. Appropriate wouldn't you say so... I even paper pieced her shoes as well. Then I stamped and embossed my purses from my MFT "Monsters Ink" set, and placed a rhinestone on top. Colored with copics, arranged purses, layered my card and added ribbon.
For the purses I found this cute template...http://www.splitcoaststampers.com/forums/showthread.php?t=424164. I used both sides of the Martini paper to create these. I added a Velcro button to the inside and put a red button on the outside attached by a glue dot.
For the martini glasses, which I got at the dollar store ($2 total) I used Martha Stewart's glitter glue and added Martha Stewart chunky glitter around the edges. Then I used some left over paper (Martini) and made olives. Attached them to the toothpick and stuck them in the glass. I used my nestabilities to cut the circles for the glass charm. I stamped her shoes and colored with copics, cut out and glued to the charm. I had some silver stretchy cord so I used that to tie it on to the glass.
I think this little set came out really cute! I really like the glasses but I think they will just be for show. Don't want to swallow a bunch of glitter! TFL




Friday, March 27, 2009

Meow meow meow...

I have a sweet little one eye kitty named Peaches...who meows all the time!!! In the middle of the night, she's meowing in my ear, during the day she's meowing. The only time she isn't meowing is when she is eating. Now I've heard cats only meow when they are hungry...but I don't know. I think Peaches is telling me to pet her, okay she's demanding me to pet her. If I pet her as much as she would like, she would be bald!! She is a very spoiled little kitty.

For this card I used my Clear Dollar Stamps: Momma Kitty, Simon (x 3), and Kitty Toys. First I stamped my kitties in Brilliance graphite black ink and then colored with copics. I then stamped my fish onto gray cardstock to make background paper with the versamark then added CTMH's black embossing powder. I put brads on the corner of the fish background paper and then tied ribbon around the layers of cardstock. I then added layers of cardstock and pattern paper to the actual card. The pattern paper is from Making Memories small black dots. I attached the fish paper to the other layers by putting it up on foam dots. I really like the gray and turquoise color combo. This was one of those things that just happened...no planning involved. Hope you like it!


Thursday, March 26, 2009

For a Friend

One of my good friends last day at her 'old' job is Friday. She's my two older girls school nurse. She is the one who bandages my kids when they get there hand caught in the door, run into the door, fall and scrap a knee, get a splinter, or just need some TLC. She is not going far off, she's going to a local high school. Crazy, yes she might be, I hear high school kids are SCARY!!! She will be closer to her kids, same school, so that is a plus. I sure am going to miss her.

I decided to make her this little band aid tin and a few band aids to go with it. The band aids are just one inch by 3 1/2 inch strips and I used my one inch square punch for the middle. I stamped little dots with CTMH's "Dots All Around" and the heart with Scrappy Cats, heart stamp. Then I sponged the edges and adhered the middle to the strip. I put a few little sayings on the back of each band aid. Then for the tin, I used Foof-a-la "Hall Pass" paper and adhered it to the tin with red double sided sticky tape. Next I used SU's ribbon for around the top and the bow. I had some left over green that I decided to add to the mix. I cut a strip to fit the top and used my Marvy corner rounder. Then for the tag, I used SU's "Happy Hearts" (stamped in CTMH's Vineyard Berry" and CTMH's "Whooo Loves You" stamp set for the sentiment (stamped in Jim Holtz Distress Ink brushed corduroy). I free cut the red cardstock and then punched a hole and placed an eyelet. I attached the ribbon with stretchy silver elastic. On the back of the tin, I put a little band aid. I used SU's slit punch and then cut a square to match. I also sponged the edges and added dots with a marker.
The front...
The back...


K-I-S-S-I-N-G...

I got caught kissing! Kissing my stamps that is. I love how you can take a solid stamp "kiss" it to a stamp that has a pattern and wam bam you have a new image. I used CTMH's "Cottage Floral" stamp set for this card. The flower was a solid image. Then I stamped them in Hollyhock, Goldrush, and Indian Corn Blue. I then took and stamped the inked stamp in to Martha Stewarts "Clear Patterns" Stamp set and CTMH's "Spot On Backgrounds". Then I stamped it on to white cardstock. I did do this process a few times to get the 'just right' look I was trying to achieve. I then cut out two flowers glued them together and then used my crop-o-dile to punch a hole in the center of the flowers and put big black brads in the center from Spare Parts. I also stamped Celebrate in Brilliance graphite black ink from CTMH's "Shining Star" stamp set, then sponged my edges. I used my Martha Stewart edge punch on white cardstock and then sponged those edges as well with Jim Holts, Distressing Ink. Then I started layering my card on red and light blue cardstock. I love this color combo! The pattern paper I used was from Best Occasions. I placed the flowers up on foam dots and that completed my card. This was actually a really easy card to make. The hardest part, which really wasn't hard was getting the right "kiss" from my stamps. Thanks for stopping by~


Wednesday, March 25, 2009

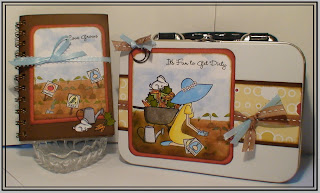
Who is that Masked Planter?

This was for the MFTIJ02 challenge. We were to use masking on our card or project. So first I drew it out and numbered what I needed to stamp first so I wouldn't get all confused and have to start over...like I had done earlier and that's when I got the great idea to draw it out...LOL.


Then once I had it all masked I realized it was way too BIG for a card...so that's when my inner Pooh Bear came out and I had to "think think think".

Here's a close up of my masked carrots...I was still thinking....
Then it hit me!! I would make a gardening kit. It IS that time of year to start planting flowers and veggies so this would be perfect. I cut my image in half, which really stressed me out. I mean what if it didn't look right how do I fix it if it's cut in half...what if I mess it up and how do I go back to recreate it...very stressful!!! But luckily none of those things happened...whew!
I made the little "seed book" with my bind-it-all. **I really need to use it more because it does make cute little things, and my hubby says I don't use all of my stuff that I have...so this is me saying see I do USE my things! hee hee**
The inside...


Monday, March 16, 2009

A MFT kind of day...

Last night when I went to bed I dreamed of a little bunny reading around a mushroom. This is not unusual for me because I have on occasion some weird dreams, but they do help me with my creativity. So when morning came, and all my mommy chores were done and (most importantly) I had my first cup of coffee I sat down and made this card. I cut out my little mushroom, now it may not seem like a normal mushroom but it's what I pictured in my dream. Then I stamped Flopsey (Ancient Page archival ink) from MFT's "Reading Flopsey" and colored him with my copic markers and cut him out. I then decided he needed to be sitting in some soft grass. So I used the grass from MFT's "Hooga Booga" stamp set. Added a few layers of cardstock and then stamped my sentiment (MFT's "What's the Story") on my strip of cardstock. I'm thinking of adding some more "pages" and making a book, I think this would make a great cover for one.


I made this card using MFT's "Tea with Flopsey". I stamped my image in Ancient Page archival ink then colored the tree and Flopsey with my copic markers. I sponged on my clouds and then I stamped an extra tea kettle, and leaves to give it a little 3D effect. I decided to rough up my edges on the light yellow cardstock and distress them. I used SU's "Linen" to stamp the back of the Flopsey image so that when I folded the corner down you would see it instead of just plain white. I wrapped the ribbon around the light yellow cardstock and then through the white cardstock which I punched with my slot punch from SU. Tied the knot and ta da...there you have it.