Monday, July 13, 2009

You’ve heard of Christmas in July….

….but what about Halloween in July.  I originally had made this card for a Whipper Snapper Challenge but ended up not sending it in because, well to be honest I procrastinated.   It was supposed to be in by the 15th of July and with it being the 13th that doesn’t give me much time to get it in.  So I opted to not send it and keep it for Halloween. I had a lot on my plate this month and I had to prioritize.  But on a happier note, I am getting a head start on my Halloween cards.  Yay!!! 

DSC05074

Here is a close up of the card…

DSC05075

Saturday, July 11, 2009

For A Good Cause…

I love when companies, like Cosmo Cricket, do things to make the world a better place.  With that said have you ever been hungry, wondered where you would get your next meal, or how you would feed your kids?  Fortunately I have never had to worry about this, but I know many other’s have.  Cosmo Cricket is going to donate $1 for every comment made to this post… Cosmo Cricket to their local food bank.  They are not asking you for donations, just  post a comment.  So stop on over and leave a comment…you will be helping someone who is in need.


images

See Ya Later Alligator

You know you want to say it……After A While Crocodile!  Hee hee, my kids and I say that a lot here at home.   As I was blog hopping the other day I saw Chicken Scratch make these cute animals out of punches.  So I decided to make this oh so cute alligator.  I just couldn’t resist!  Plus I had the “Life’s a Jungle” stamp set from CTMH and then sentiment was perfect for this card.  Plus I was able to use up some scraps that had been lying around my desk. 

Hope you like it….

DSC05069

inside view…

DSC05072

Friday, July 10, 2009

Aloha

Aloha, I’m back!!!  Did you miss me?  I know it’s been about 3 weeks since I last blogged but I just didn’t have the time to fit blogging into my life.  Life has been BUSY!!! I had 2 weeks of family visiting and then my anniversary (10 years!!) then the 4th of July and then I decided it was time to have a little break and relax from all the fun and excitement that had been going on.  Plus I was exhausted!!! I did miss crafting!!!  I would walk into my craft room, take a deep sigh, and think maybe after family is gone I will have some time for you my poor neglected stamps, ink and paper.  I did enjoy spending time with family since some of us are spread all over the place.  But it was so nice to sit at my desk and create again!!  I made these little creations for my stamp group at my sisters house.  We went over to hang out, bounce ideas off each other and just veg!  She actually is the one who came up with the idea of stamping on newspaper….and that led to stamping on pages of a book I had.  My sister, Sheila, is like my other half.  She gives great advice, listens to my problems and helps me figure out a way to solve them and is always there for love and support!  And to her I owe a ton of Thanks You’s!!!

For these cards I used this pretty color combo of….CTMH’s Hollyhock, Chocolate, Crème Brulee, Garden Green and Sweet Leaf.  The stamp sets I used were CTMH’s Surf’s Up, Extreme Happiness, and Treetops.  The pineapple card is 7 1/2 x 4.  I pierced my white squares then sponged the edges.  I used sweet leaf for the tops of the pineapple and crème brulee for the pineapple.  I also tied some natural cord around each square.  This cord is actually for jewelry so look in that section of the craft store for it.  I tied a button on for just a little more added detail.  I also stamped the big flower from Extreme Happiness on to the Hollyhock paper.  I really liked how this card turned out.   The Luau card is 5x4.  I used my score pal to add some detail to the side of the card.  I really like how the flower turned out too.  I think stamping on newspaper, book pages, music paper is really cool!  I also put the center of the flower up on foam dots and added glitter to the tip of the flower.  For this card I also used some paper from the Bella paper pack and then used my fiskars edge punch.  I think this is my favorite of all the cards.

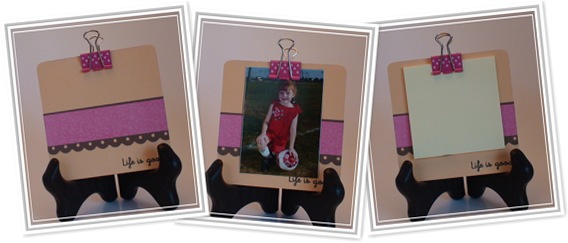
I always like to do a little project at my stamp club so I made this coaster post it note holder/picture holder.  The coaster is 4x4 and then I just added paper and stamped my sentiment.  The cute little clip was bought at Michael’s (6 for a $1=BARGAIN!!!). 

Well thanks for checking out my blog!  I hope you have a great day!

xoxo,

Rebecca

Monday, June 15, 2009

Happy Father’s Day!!!

 DSC04722

Happy Father’s Day to my hubby!  I have to brag for a moment…my hubby is the best husband and father in the world to our  3 girls!  There is not a moment that goes by that he isn’t doing something for us or treating us all like princesses.  He always has our best interest at heart.  He is loving, kind and compassionate.  Not to mention very handy!!  He just put in a brick side walk along the side of our house and I have to say he did an awesome job!!!  He is my Mr. Fix it, Mr. Find-It (long story short, I looses something he ALWAYS finds it for me :o), and Wonderful Daddy, and Loving husband!  He is my rock, and my soul mate.  I don’t know what I would do with out him!

Okay now back to my little project…

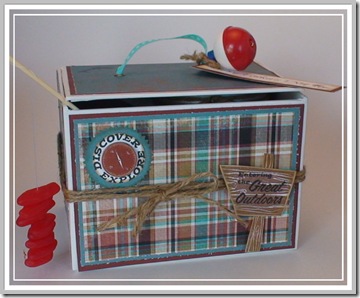
I had this little white cardboard box and a vision…and THIS time my vision actually transferred into a reality!!!  I love that when it happens. 

Here’s what I  used: CTMH’s “Sarsaparilla” paper pack, barn red ink, momento black and brown ink, foam dots, twine, nestabilities, jars, Martha Stewart circle cutter, computer generated sentiments,  candy, fishing bobber, fishing hooks, “happy father’s day” stamp by Paper Inspirations and Campin’ Fever stamp set.

The top…

DSC04728 

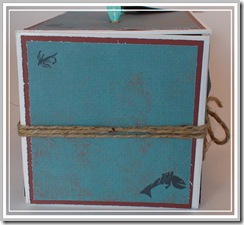
The sides….

DSC04732                    DSC04733DSC04731

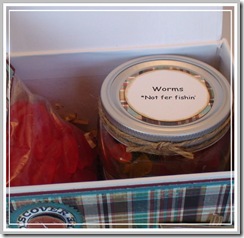
What I put inside….

DSC04723

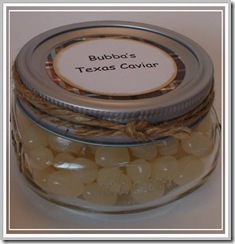
Bubba’s Texas Caviar & Worms *Not fer fishin’

The “caviar” is cream soda jelly belly’s, and gummy worms…

DSC04724 

Close up of the “caviar”…

 DSC04727

The fishing pole with some fish…

DSC04726      

I know my hubby will love this.  He loves Swedish fish and he’ll love his “caviar”.  We plan on going fishing after our BBQ at my sisters, so this will be perfect for him!


I hope you all the father’s in your life have a wonderful Father’s Day!!!


Rebecca

Monday, June 8, 2009

Simple and Sweet!

Sometimes I get in a mood where I just want to make a simple card and just have fun making it. I don't want to worry about the color combo, what accessory am I going to use, just simply play with my stamps and see what comes of it! So I decided since I hadn't used my cuttlebug in a while that I would dust it off and get out some new spellbinders that I haven't played with. I am really bad about buying something with the intent to use it right away and it sits on the shelf for a week, or *gasp* a month or two!!!

For this card I just used my flower die cut, and circle die cut to cut out the center. I cut out a larger circle for the middle of the flower, embossed it and adhered it behind the pink flower. I stamped my flowers with CTMH "Spot On Backgrounds" stamp set in Watermelon. For the stem and grass I used CTMH "Circle Around" stamp set in Citrus Leaf. I'm not sure where my cardstock is from, I decided to recycle and use what I had laying around. I tied some ribbon, stuck it on with a glue dot and added some stickers for the sentiment.
This card was basically created the same way as the one above but I used buttercup ink and paper, and cranberry paper from CTMH. I also used the sentiment from "Treetop". I love that little sentiment, it has to be among one of my favs!!

This card is for my card class. We do one simple card, one technique card, and one project. So I decided it would be fun to show my class how to make a shaker card. My girls have had a blast shaking the stars all over the house!

For this card I used cranberry and buttercup paper, magic moments paper pack and regular white cardstock from walmart. I did use my cricut a lot with this card. I made my scallops, stars, and frame using my cricut. I added some white buttons and cranberry waxy flax tied through to the stars. I also stamped the stars and sentiment from "Shining Star" stamp set from CTMH. I added a touch of pixie dust from Shimmerz to my stars at the bottom. I felt they needed to sparkle! To make the frame I stamped my sentiment, cut my clear projector paper a little smaller than the frame, adhered it to the frame, cut strips of foam tape to each side leaving no space for stars to fall out, added some stars and adhered.
I really had a fun time just relaxing and creating! No stress, no worries, no problem!

Have a great day!
Rebecca


Sunday, June 7, 2009

Schools OUT!!!!

Can I get a Whoo Hoo!!! School's out for summer!!! Okay now I have Alice Cooper's song playing in my head...


Here are just a few things I made for the teachers. This little tin was one that I had gotten from Oriental Trading and just never used it. Since it was being neglected, I decided now would be a good time to use it! I used stamps from Snag 'Em, paper from Imaginisce "Teacher's Pet, Welcome to Room 10", and cardstock from Hobby Lobby in brown, red and olive green, ink is Momento, and the accessories are ribbon, buttons, hemp, glue dots, red lined tape, and a pencil. I filled the tin with chocolate nuggets and wrapped them with the paper. There was a little bit of room left in the tin so I had my 3 year old make a picture for her teacher and we rolled it up and tied it. I think this turned out very cute and my 3 year old was very excited to give it to her teacher!


Here are some autograph books I made for my kindergartner's class. They are just red cardstock from Hobby Lobby, brads and I used my nestabilities to cut out the computer generated sentiment. I did stamp the star (CTMH's "Shining Star") in Sunflower.


Here I used MFT's new stamp set, "Teacher, Teacher Label Set". I stamped the images in Momento ink. I colored the books and the ruler with my copics. I used Ranger's Adirondack Lights in Snow Cap for my sentiment to make it look like it was written in chalk. I paper pieced my border for the chalk board with paper from DCWV Grade School stack. The
rest of the dp is from the same paper stack. The solid cardstock is from Hobby Lobby. This gift card holder is really neat. When you open it the gift card seems to slide up into view for the recipient. I got the idea from Julie of Paper Pleasing Idea's....here is the blog I got it from...
http://paperpleasing.typepad.com/my_weblog/page/6/ She is a very creative lady, so go check out her blog.

Here is a close up ...


Another close up side view of the inside...


Thanks for looking. I hope these help inspire you!